
Detailed Guide to Configure Remote MySQL Access in cPanel Hosting
Remote MySQL in cPanel allows users to manage their MySQL databases from remote locations through the internet, offering a practical solution for web developers, database administrators, and website owners who need to access their databases away from the local server where the databases reside. Here are some of the primary advantages and disadvantages of using Remote MySQL in cPanel:
Advantages of Remote MySQL in cPanel:
-
Accessibility: Provides the flexibility to access and manage MySQL databases from any location, not just the server where the database is hosted. This is particularly useful for teams working remotely or for managing multiple client databases from a single location.
-
Performance: Separating the database server from the web server can lead to improved performance on both servers, as each can be optimized specifically for their tasks (web serving vs. database management).
-
Security: By isolating the database server from the web server, you reduce the surface area for potential security breaches. Remote access also allows for robust security measures like SSH tunneling and VPNs to secure the data in transit.
-
Scalability: Remote MySQL can be more easily scaled. If the database needs more resources, it can be moved to a more powerful server without affecting the web server, and vice versa.
-
Backup and Recovery: Easier management of backups and disaster recovery processes as administrators can access the database servers from anywhere to perform these critical tasks.
Disadvantages of Remote MySQL in cPanel:
-
Security Risks: Opening up MySQL to remote connections can expose your database to potential cyber-attacks. It requires strict security protocols like IP whitelisting, strong authentication measures, and encrypted connections to mitigate these risks.
-
Complexity in Setup and Management: Configuring remote MySQL access involves several detailed steps that can be complex, such as configuring firewalls, managing user privileges, and ensuring secure connections.
-
Network Latency: Depending on the network setup and the distance between the client and the server, there can be noticeable latency in database queries, which might affect performance for time-sensitive applications.
-
Dependence on Internet Connectivity: Remote database management relies on continuous and stable internet connectivity. Any connectivity issues can disrupt access to the database, affecting the availability of applications that depend on it.
-
Resource Intensiveness: Maintaining security and efficiency in remote connections often requires additional resources and overhead, like VPN services and advanced security software, which might increase operational costs.
Steps to setup Remote MySQL in cPanel:
Step 1: Log in to Your cPanel Account
To start, you'll need to access your cPanel dashboard. This is typically done by entering a URL similar to http://yourdomain.com/cpanel. Once you reach the login page, enter your username and password to proceed. After logging in, navigate to the section labeled ‘Databases’. This area consolidates all the tools necessary for database management, providing a centralized spot for your subsequent actions.
Step 2: Access the Remote MySQL Feature
In your cPanel’s main screen, look for the ‘Remote MySQL’ icon under the ‘Databases’ section. This feature allows you to manage external connections to your MySQL databases. Clicking on this icon will open a new page where you can specify which remote computers can access your MySQL databases.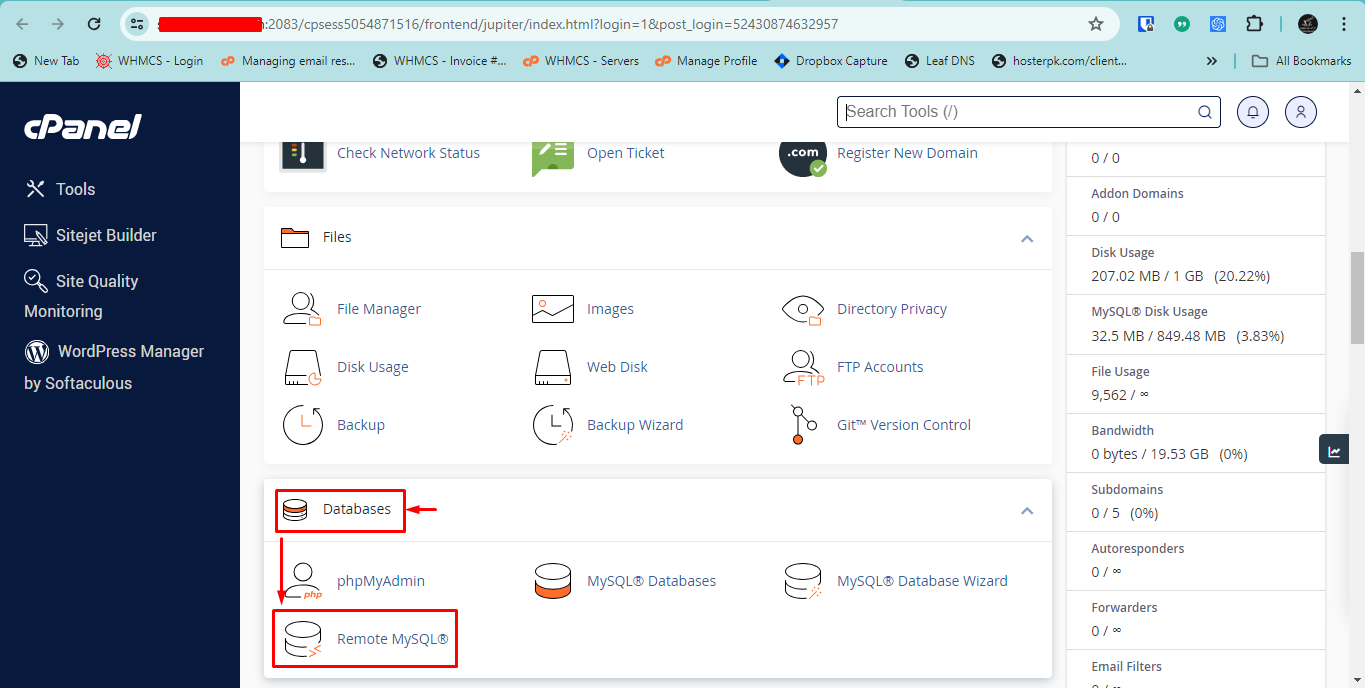
Step 3: Add Remote IP Addresses
- Specific IPs: Here, you’ll see a field to enter the IP address of the remote computer that needs access to your MySQL server. If the remote IP is not static, you can use a wildcard, like
192.168.1.%, to authorize an entire range of IP addresses, which can be very useful if you need to allow access from a dynamic IP range or multiple devices within the same network.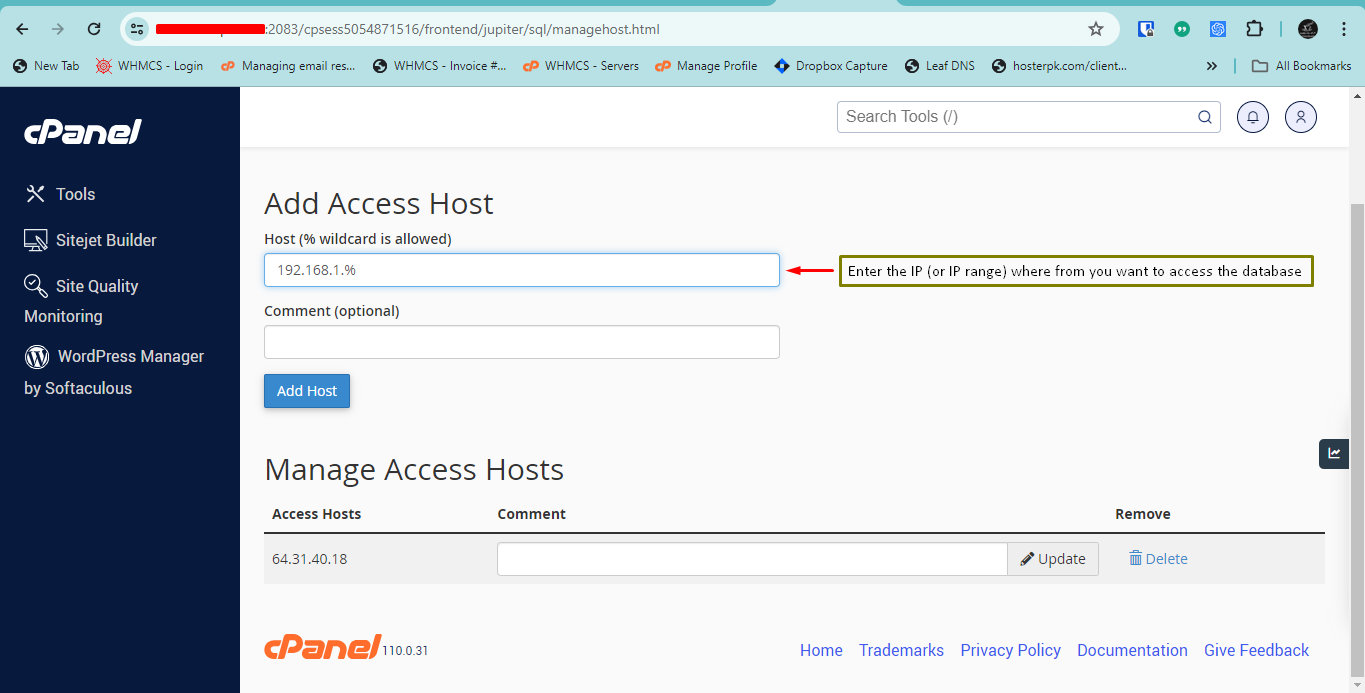
- Note the Details: There's often an option to add a comment or description for each IP address you enter. Utilize this feature to label IP entries clearly (e.g., “John’s workstation” or “Home Office”). This helps in future management and security audits by identifying authorized users quickly.

Step 4: Configure MySQL User Privileges
Access to your MySQL database from remote locations requires proper user privileges.
- Manage Database and Users: Navigate to the ‘MySQL Databases’ section where you can either create a new database and its user or edit an existing one. Ensure the user is configured with the necessary permissions.
- Set Permissions: Assign appropriate privileges that the user needs to effectively manage the database remotely. Typical necessary privileges include SELECT, INSERT, UPDATE, and DELETE. Make sure to link the user to the intended database with these privileges by selecting the correct options in the ‘Add User to Database’ area.
Step 5: Connect Using Third-Party Software
To use your database remotely, you'll need a database management tool like MySQL Workbench, HeidiSQL, or even a web development environment like Adobe Dreamweaver.
- Configuration Requirements: These applications will ask for your database’s hostname or IP, the database user name, and the password. The standard MySQL port is 3306 unless your hosting provider uses a different one.
- Secure the Connection: If your data is sensitive, consider setting up an SSH tunnel for the connection, which encrypts the data sent over the network, enhancing security.
Step 6: Test Your Connection
Once you’ve configured the settings, it’s crucial to test the connection:
- Verify Connectivity: Use the third-party software to connect to your database. Check that you can perform database queries and updates as expected.
- Troubleshoot Problems: If you encounter any issues, double-check the IP addresses allowed, user privileges, and ensure that your database user settings in cPanel are correctly configured.
Best Practices for Security:
- Limited Access: Only allow necessary IPs to connect.
- Password Strength: Use robust, difficult-to-guess passwords for all database accounts.
- Updates: Regularly update your cPanel and associated applications to protect against vulnerabilities.
- Monitoring: Keep an eye on access logs to spot any unauthorized access attempts.
- Encryption: Employ SSL/TLS encryption for all data transmissions to ensure data integrity and privacy.
By following these detailed steps and maintaining rigorous security practices, you can effectively set up and manage a remote MySQL connection through cPanel. Remember, if you encounter any issues, please open a support ticket or start a LiveChat for immediate assistance.