
Why I need to Add SPF and DKIM
- SPF allows email servers to verify that incoming mail from a domain was sent from a host authorized by that domain's administrators.
- DKIM adds a digital signature to emails, allowing the recipient to check that the domain owner authorized an email claimed to have come from a particular domain.
Adding SPF and DKIM in cPanel
SPF and DKIM are added by default when your use cPanel account is set up, simplifying the setup process.

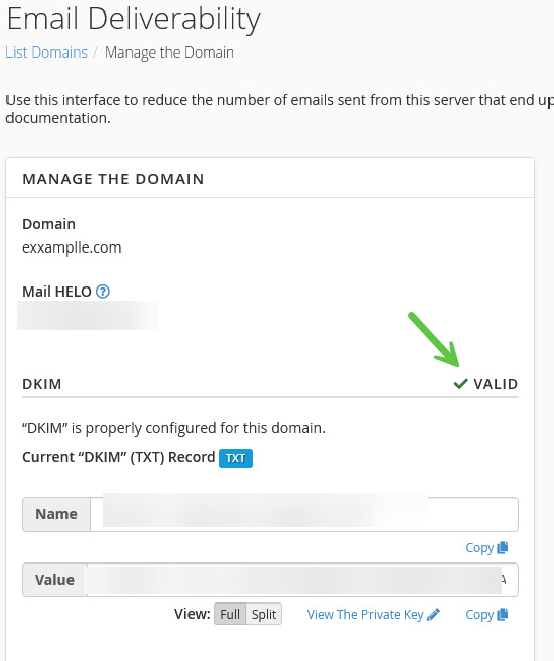
You should see 'Valid' under the 'Email Deliverability Status' section. You must install the records if you don't see a valid status. Here is a step-by-step process:
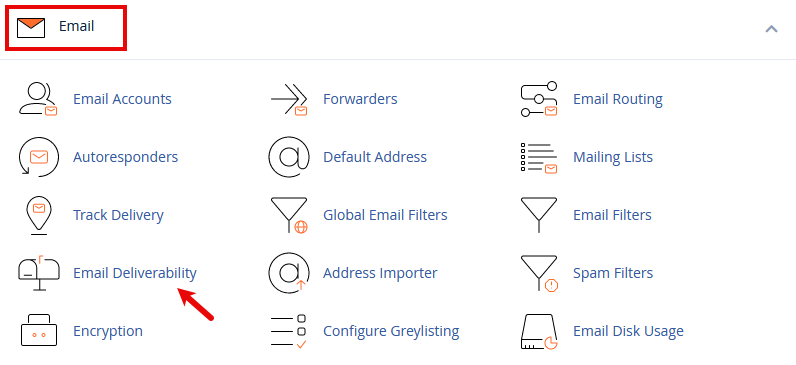
- Log in to your cPanel account.
- In the Email section, click on the Email Deliverability icon.
- You'll see a list of your domains. Click Manage next to the domain you want to configure.
- Here, cPanel will automatically generate and display your SPF and DKIM records.
- If not already enabled, you'll have the option to install the records. Clicking this will update your domain's DNS settings accordingly.

Handling Third-Party DNS Providers Like Cloudflare
You must manually add the SPF and DKIM records to your DNS settings using a third-party DNS provider, such as Cloudflare.
Steps for Adding SPF and DKIM Records on Cloudflare
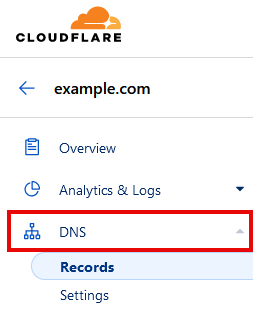
- Log in to your Cloudflare account and select your domain.
- Navigate to the DNS section.
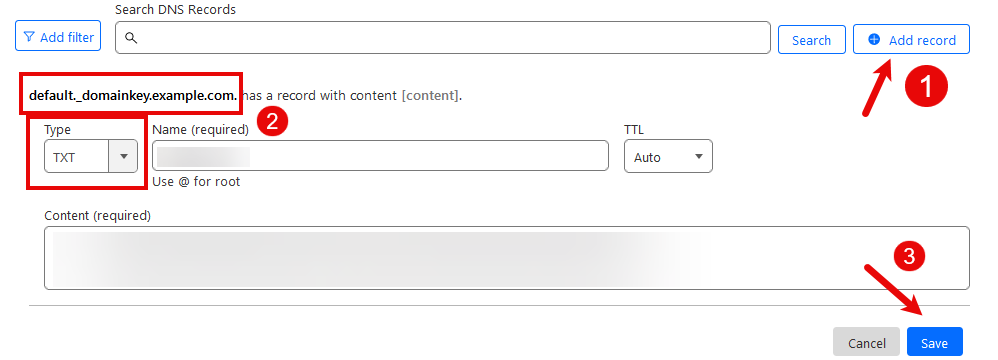
- To add an SPF record, select TXT as the type, enter your domain name in the Name field, and paste the SPF record from cPanel in the Content field.
- For DKIM, select TXT as the type to provide the specific Name (usually something like
default._domainkey) as provided by cPanel, paste the DKIM record in the Content field. - Save the changes. It might take some time for these changes to propagate across the internet.
Summary
Implementing SPF and DKIM records via cPanel is a straightforward process that significantly boosts email security. If you're using a third-party DNS provider, manually updating your DNS records is also simple.
Remember: Regularly check and update your SPF and DKIM records to include any new email services you may start using. This ensures continuous protection against email spoofing.
If you encounter any issues or need further assistance, please open a support ticket here or initiate a LiveChat session using the icon at the bottom right of the screen. For professional email services, visit our email hosting page.
For more detailed guides on managing your email settings, refer to our knowledge base articles on setting up new email accounts, accessing webmail, configuring email on mobile devices, and more, available at intoHOST.